Update: It appears Nuget automatically creates its own local cache, located at C:\Users\<username>\AppData\Local\NuGet\Cache. You can use this as a package source as well. You can read more on Scott Hanselman’s post.
Update: If you want to share a local, organisation-wide repository, you can use Nuger.Server. Check here and here for more information. Nuget.Server can be used with the local repository I describe in the rest of the post.
Nuget took a long time coming. Maven has already been around for years, and the .Net space needed a package management solution. Now that it is here, I use it extensively. I find the VS integration quite polished and enjoyable to use. There are however several friction points I dislike. The most major of these is that there is no local cache or repository of packages created for you. I.e. when you download a package, it gets added to the particular solution only. When you remove the package from a project, the package gets deleted from your hard disk. The current workflow (with the VS plugin) requires you to re-download a package every time you add it in a new solution. This is a bit silly considering you may use the same package in many different projects and solutions at the same time.
Update: in the comments below, Riaan reminded me of other reasons I wanted to have a local repository. Firstly, the package manager’s connection model is terrible. For slow or occasional connections (like mobile connections), it just isn’t feasible to download the same package multiple times for different projects/solutions. Secondly, the package manager dialog is modal, so you can’t use Visual Studio at all while you’re downloading packages (a real pain with a slow connection). [end update]
What I require, (and which Maven does by default), is to download the packages to an isolated repository on my own machine, and then install packages into projects/solutions from the local repository . It turns out this is pretty easy to achieve. All you need is a one or two Powershell commands, and some minor fiddling with the VS package manager.
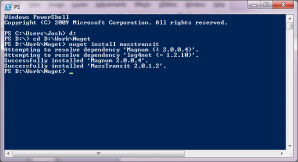
First off, create a new folder on your drive for your repository. I put mine in D:\Work\Nuget, but it doesn’t matter where it is. You’ll need the Nuget.exe, either from Nuget 1.6 or from the Nuget Command Line package, and to make it easy the path to the executable should be on your path. When you want to download a Nuget package, fire up a new Powershell shell, navigate to your repository folder and issue the command:
nuget install <package name>
for example:
nuget install MassTransit
Nuget will then download the package and its dependencies. There will be a folder per package.
The next step is to set up the VS package manager so it knows where to look. In VS, go to Tools -> Library Packet Manager -> Packet Manager Settings
Navigate to Package Manager -> Package Sources. Fill in the two boxes with the details of your repository. I’ve named mine Local, and it can be found at D:\Work\Nuget.
Then click Add. You should now be able to install packages into projects from your local repository. To check, open the Library Package Manager in VS. The Online section on the left hand should now contain both ‘Nuget official package source’ and ‘Local’. Click on Local and you’ll see the list of locally installed packages.
You now need download each package only once, and can install to any project.


